DIY Wooden Planters
When you make a purchase through links on our site, we may earn an affiliate commission As an Amazon Associate I earn from qualifying purchases..
Building your own wooden planters is a fun and rewarding project that allows you to personalize your space and enjoy the beauty of gardening.This article will walk you through all of the steps you need to make a sturdy, beautiful wooden planter that you can use around your house. In addition to giving you easy-to-follow instructions, this guide will also provide you with links to some of the best sources of wood and other materials you may need.

Building Simple DIY Wooden Planters: Step-by-Step Guide
Liven up your space with some greenery by creating your own versatile wooden planters. This guide provides instructions for two popular designs, allowing you to choose the one that suits your preference:
Materials:
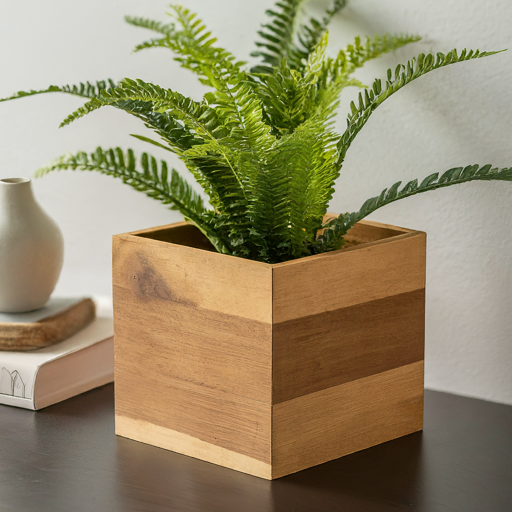
Option 1: Square Planter:
- (4) pieces of 1″ x 4″ board, cut to your desired length (for the sides)
- (4) pieces of 1″ x 2″ board, cut to a length 1 inch shorter than the side pieces (for the bottom)
- Wood screws (1 1/4″)
- Wood glue (optional)
- Sandpaper (various grits)
- Finishing materials (paint, stain, etc. – optional)
- Drill
- Miter saw or hand saw
- Pencil
- Tape measure
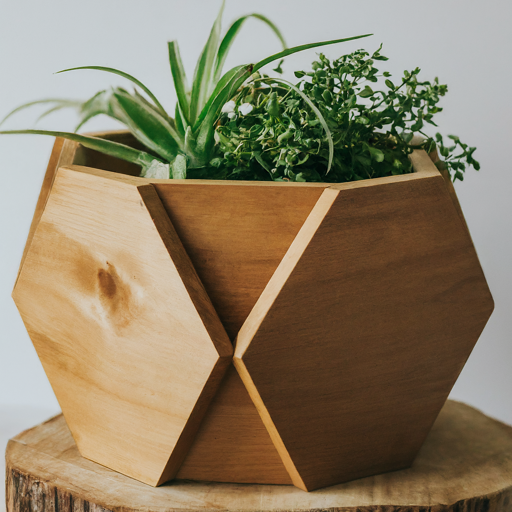
Option 2: Hexagonal Planter:
- (6) pieces of 1″ x 6″ board, cut to a length twice the desired width of the hexagon (for the sides)
- Wood screws (1 1/4″)
- Wood glue (optional)
- Sandpaper (various grits)
- Finishing materials (paint, stain, etc. – optional)
- Drill
- Miter saw or hand saw
- Pencil
- Tape measure
- Compass or protractor (optional)
Instructions:
General Steps:
- Cutting the pieces:
- Use the miter saw (or hand saw) to cut the pieces according to the chosen option:
- Square planter: Cut the 1″ x 4″ boards to your desired length for the sides and the 1″ x 2″ boards 1 inch shorter than the side pieces for the bottom.
- Hexagonal planter: Cut the 1″ x 6″ boards to a length twice the desired width of the hexagon (6 equal side lengths for a hexagon).
- Use the miter saw (or hand saw) to cut the pieces according to the chosen option:
- Sanding the pieces:
- Sand all surfaces of the pieces using various grits of sandpaper, starting coarse and working your way to finer grits, to achieve a smooth finish.
- Applying the finish (optional):
- You can paint, stain, or apply a sealant to the wood pieces before assembly for aesthetics and weather protection.
Assembly:
Square planter:
- Pre-drill pilot holes (optional):
- Drill pilot holes through the designated areas on the 1″ x 4″ pieces (sides) to prevent splitting when screwing them together.
- Assembling the frame:
- Option 1 (without glue):
- Align the 1″ x 4″ pieces to form a square, with the ends meeting at right angles.
- Screw the pieces together at the corners from the outside.
- Option 2 (with glue):
- Apply wood glue to the edges of the 1″ x 4″ pieces.
- Align the pieces to form a square, and clamp them together to ensure a tight fit.
- Screw the pieces together as described in option 1.
- Option 1 (without glue):
- Attaching the base:
- Option 1 (without glue):
- Position the 1″ x 2″ pieces (bottom) flush with the inside of the assembled frame.
- Screw the bottom pieces to the sides from the inside of the planter.
- Option 2 (with glue):
- Apply wood glue to the bottom edges of the assembled frame.
- Position the 1″ x 2″ pieces (bottom) flush with the inside.
- Clamp the pieces together and screw them as described in option 1.
- Option 1 (without glue):
Hexagonal planter:
- Marking the angles (optional):
- For a more precise assembly, mark 60-degree angles on the ends of the 1″ x 6″ pieces using a compass or protractor.
- Assembling the frame:
- Option 1 (without glue):
- Align the 1″ x 6″ pieces to form a hexagon, with the angled ends meeting flush.
- Screw the pieces together at the connecting points.
- Option 2 (with glue):
- Apply wood glue to the angled ends of the 1″ x 6″ pieces.
- Align the pieces to form a hexagon and clamp them together for a tight fit.
- Screw the pieces together as described in option 1.
- Option 1 (without glue):
Finishing touches:
- Lining the planter (optional):
- To prevent soil leakage and extend the life of your planter, consider lining the inside with a plastic liner or landscaping fabric.
Tips:
- Double-check your measurements and cuts before assembly to ensure a proper fit.
- Pre-drilling pilot holes helps prevent the wood from splitting when screwing the pieces together.
- Clamps can be helpful to hold the pieces together securely during assembly, especially for the hexagonal planter.
- Consider adding drainage holes to the bottom of the planter to prevent waterlogging and root rot. Drill several small holes evenly spaced across the base.
- You can customize your planters further by painting them in different colors, adding decorative elements like stencils or wood burning designs, or using different types of wood.
Safety:
- Wear safety glasses and gloves when using power tools.
- Be mindful of sharp edges and take precautions to avoid cuts.
Tiered
Wooden planters are a great way to grow plants in small spaces. They’re also inexpensive and can be constructed quickly and easily. They’re a wonderful addition to any home, deck, patio, or garden. You can create a planter box in any shape or size. Whether you’re looking for a simple herb garden, or a more complex box for a larger pot, a wooden planter is a great solution.
A planter box can be made in less than two hours. Depending on your woodworking skills, you can use different types of wood to create your own planter. Some of the best options are cedar and pine. They’re durable, and they’re easy to stain. You can also line the inside with other materials for additional protection.
A tiered planter box is a great beginner project. It’s a simple, inexpensive way to liven up your front porch or balcony. You can build one in just 45 minutes with $10 in lumber.
First, make sure that your boards are stacked properly. You can do this by using a speed square or other straight line guide. A straight line guide is especially important for straight cuts.
After your boards are stacked, you’ll want to cut them to fit. You can do this with a saw, jigsaw, or circular saw. You’ll want to start with the shorter end pieces, and then work your way out from there.
Next, you’ll need to drill holes for drainage. You’ll also need to put a false bottom into your planter. This allows you to fill it with soil without having to fill it to the top. A false bottom allows you to water your planter without having to worry about the wood getting wet.
Once you’ve finished building the bottom, you’ll need to attach the side supports. These will consist of 1×6 slats that you’ll attach to the sides of the planter. You’ll need to secure them with 2” brad nails.

For a more modern planter, you can build a three-tiered corner plant stand. It’s easy to make, and it fits any decor.
Vertical stacking
If you want to display your plants, there are a variety of ways to go about it. If you don’t have a lot of space, consider hanging a vertical planter. You can make one using inexpensive plastic piping. If you have a bit more space, consider a tiered planter. Alternatively, a mobile planter is an excellent idea.
If you’re interested in adding a touch of style to your garden, consider a monogram planter. They’re simple to make and will stand up to wind and rain. They’re a great way to decorate your yard and make your outdoor living space feel like a home.
You can use spray painted tin cans or other containers for this project. They’re a great way to keep your planters low-maintenance and inexpensive. You can even paint your own cans to match your garden’s decor.
You can also make this type of planter from scrap wood or pallets. The design is simple, but requires a little bit of attention to detail.
To get started, you’ll need to determine the size of your planter. The diameter of the largest piece should be at least two feet, while the height should be a couple of inches taller. You should also consider the amount of materials you’ll need to build the planter. You’ll need about a hundred pounds of material, including three to four standard-sized bags. You’ll also need some organic fertilizer to help your plants.
Once you’ve gathered your supplies, you’ll need to cut the pieces of your planter to the correct sizes. The front diagonal legs should be rough cut to provide wiggle room. Then you’ll need to mark the top of each panel and secure them in place.
Once you have your planter, you’ll need to fill it with soilless potting mix and compost. You can also add weed matting to protect the wood from rotting.
You may wish to add brackets to the sides to add a touch of whimsy. You can also choose to use metallic hardware to enhance the modern look of your planter.
Pallet
Pallet woodworking instructions are an excellent way to create a planter without breaking the bank. They can be found online and in your local industrial estates. The good news is that the project can be completed in a relatively short time.
Before starting, make sure to check the condition of your pallet. It can be a bit brittle and splitting might occur if you put in too many screws. You might want to cut some of the boards loose before starting. This will allow for easier assembly.
One of the simplest transformations you can do is to create a planter box. This is a vertical structure that can be placed on the wall or fence to hold a few plants. You can find a video demonstration of the process on the Lovely Greens blog.
Another useful way to improve the functionality of your pallet is to line it with weed barrier fabric. This fabric is sold in most home improvement stores and can be used to keep the soil inside. The key to a successful planter is to ensure that there is no water or mud at the bottom. You can also use chicken wire stapled to the fabric to prevent it from moving.
A nice touch to your planter is to paint it. You can do this in a variety of colors to complement your garden. The paint can be painted on the top and the sides of your pallet.
You can use pallets to make a number of different planters. You can have a tall planter that is a freestanding fixture, or you can build a smaller box. The possibilities are endless. You can even create a vertical planter with pallet tops.
To complete the project, you will need a few tools. A reciprocating saw will be necessary to cut longer stretches of wood. You can also use a nail gun to attach the smaller pieces of wood.
A staple gun can be a useful tool to attach the weed barrier fabric. You can also use a hammer to wiggle the planks out.
Modern house number
If you are looking for a way to give your front door a fresh look, a house number planter can be a fun DIY project. This is a popular craft and can be a great way to add a pop of color to your front porch.
A modern house number planter is a stylish and simple design. It is ideal for any type of home. It takes just an afternoon to complete. You can use a pre-made planter box, or you can make your own.
To start, you’ll need some wood. You can purchase a wood round for cheap at a secondhand store. A wood plank or even a cedar board can also work. You can sand and stain the boards to match the exterior of your home. If you want, you can paint them with a bright white.
Next, you’ll need a drill and fasteners. Once you’ve drilled the holes, you’ll need to secure the numbers to the planter box. To do this, affix the numbers with painter’s tape.
Once the numbers are secured, you can begin filling your house number planter with pretty flowers. Succulents and cacti are also good choices. For a more traditional look, try planting trailing plants inside.
If you’d prefer to go with a more rustic look, you can create an address plaque that features old-fashioned sans serif numbers. You can also find metal numbers to mount on the wood. You can choose between black or white to contrast with the wood. You can also purchase decals that feature decorative designs.
You can even add a hanging plant to your planter box. If you don’t have a yard, you can also attach the planter to the wall. In addition to adding style to your front door, you can also use the planter as a welcoming gesture for guests.
A house number planter can add a lot of texture to your porch. It’s a great DIY project for beginners. It’s also a fun project for kids. For a little extra fun, you can stencil the numbers to decorate them.
Remember to always follow proper safety precautions when working with wood and power tools.